
P6-01-030
Two Handle Bar Faucet Chrome Banner Faucet #181
Shipping: (EA) $10.95
Part #
P6-01-030
Shipping: (EA) $10.95
Brand: Banner Faucet
Total Price: (EA)
$58.94
Two Handle Bar Faucet Chrome Banner Faucet #181
Double Handle Faucet Repair
Faucets with multiple handles are broken down into two types
1 Compression type faucets
2 Cartridge type faucets
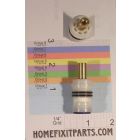
As a general rule a compression faucet you must turn the handle more than 360 degrees to turn the faucet on. A cartridge faucet you only need to turn the handle 1/4 of a turn to turn the water on. The disassembly of the faucets are very similar use the instructions below to remove the stem from the faucet body. Then find the repair instructions for your type faucet.
Step 1 Turn off water to house or under the sink you are working on.
Step 2 Using a screwdriver pry up and remove the button from the top of the handle.
Step 3 Remove the screw from the top of the handle.
Step 5 Pull the handle off.(Use Handle puller if necessary)
Shower and wide spread faucets require the removal of the flange at this point of the repair
Step 5A Using a pair of pliers (use masking tape to protect the finish)Unscrew the flange from the faucet stem body this should expose the stem assembly.
Step 6 Using an adjustable wrench or deep socket unscrew the stem bonnet from the faucet body, Or remove the cap nut from the top of the faucet body.
Step 7 Remove the stem or cartridge from the faucet body
Compression Stem Repair
Step 8 Unscrew the stem bonnet off of the stem to expose the o-ring seal.
Step 9 Using a screw driver remove the o-ring from the stem.
Step 10 Using a screwdriver remove the washer screw and washer from the bottom of the stem.
Step 11 reinstall the new washer and screw.
Step 12 Slide the new o-ring over the stem and into place in the groove of the stem. (apply a small amount of silicon grease)
Step 13 Slide the stem into the faucet bonnet making sure that you do not cut the o-ring during the process. Screw the stem back into place as far as the stem will go in the on position.
Step 14 Using a seat wrench unscrew the seat at the bottom of the faucet body and remove.
Step 15 Using a seat wrench reinstall the seat at the bottom of the faucet body.
Step 16 Make sure that the bonnet seal washers at the base of the faucet body is in place and not broken or worn, replace if necessary.
Cartridge Stem Repair
Step 8 Using a pair of pliers pull up to remove the cartridge assembly.(Plastic cartridges should be replaced rather than repaired)
Step 9 Pull cartridge apart by pushing down on the top of the stem.
Step 10 Using a screwdriver pull the o-rings off the stem and bonnet assemblies.
Step 11Replace all o-rings.
Step 12 Using a pair of pliers remove the seal and spring from the faucet body.
Step 13 replace the spring then the seal.(apply a small amount of silicon grease)
Step 14 Reinstall the cartridge.
Step 15 Tighten the cap nut over the cartridge.
Reinstall the stem or cartridge into the faucet body. Repeat process for the other stem.
Step 16 Turn on water and check for leaks.
Step 17 Replace handles and screw into stem.
Step 18 Push handle button onto handle.
Kitchen Spout Repair
Step 19 Using a pair of pliers (use masking tape to protect the finish)Unscrew the spout flange from the faucet stem body.
Step 20 Using a screwdriver pull the o-rings off the spout housing.
Step 21 Replace o-rings and slide the spout over the housing Making sure that you do not cut the o-ring during the process. Using pliers retightens the spout nut.
Your faucet repair is now complete.
3 Handle Faucet Repair
As a general rule a 3 handle faucets are used in the shower, the third handle diverts water from the tub spout to the shower head.
Repairs to the diverter are the same as the stem repair. Follow the same instruction and replace all the washers and seals for the diverter valve.
Shipping: (EA) $10.95
More from Banner Faucet